What is Colour Constructor?
Colour Constructor is a specialized tool for creating color reference and understanding how color works. It helps you build palettes for digital painting by showing how your colors actually look under different lighting conditions.
What Makes It Different
- Create Reference - Generate color swatches you can reference while painting
- Understand Color Theory - See how lighting affects color relationships in real-time
- Multiple Lighting Scenarios - Test palettes under candlelight, sunlight, moonlight, etc.
- Professional Export - Copy directly into painting software or export swatches
Who It's For
- Digital Artists - Create reference swatches and understand color relationships
- Character Designers - Study how skin tones and outfit colors work under lighting
- Environment Artists - Learn consistent color schemes for different scenes
- Art Students - Visual tool for understanding how lighting affects color theory
The Problem It Solves
Traditional color pickers show colors in isolation, but colors in artwork are always affected by lighting. Colour Constructor bridges this gap by letting you see and test color relationships under realistic lighting conditions, ensuring your palettes work harmoniously in your actual artwork.
Installation
System Requirements
- Windows: Windows 7 or later (Windows 10+ recommended)
- macOS: macOS 11 (Big Sur) or later, Apple Silicon or Intel
- OpenGL 2.1+ compatible graphics card
- 50MB free disk space
Colour Constructor is distributed as a standalone executable. Simply download the application from Gumroad and run the executable file. No installation required!
- Windows: Unzip and run the .exe file
- macOS: Open the .dmg and drag Colour Constructor into your Applications folder
Quick Start
- Launch - Run the executable file
- Add objects - Select default tiles or add your own
- Pick colors - Use sliders on the properties panel to adjust local colors
- Set lighting - Click light buttons to activate color pickers and adjust intensity
- Preview - Connect object nodes to preview panels to see colors in context
- Export - Copy tiles and previews, then paste into your painting software
- Create - Paint with your custom palette!
Keyboard Shortcuts
Colour Constructor includes comprehensive keyboard shortcuts to speed up your workflow.
File & Creation
- Ctrl + S - Save current scene
- Ctrl + N - Create new tile
- Ctrl + P - Create new preview tile
Navigation & View
- Spacebar - Pan canvas (hold and drag)
- Middle Click - Pan canvas (hold and drag)
- Right Click - Context menu (on tile canvas)
- Ctrl + + - Zoom in
- Ctrl + - - Zoom out
- Ctrl + 0 - Frame selection (recenter view)
Selection & Navigation
- Tab - Navigate to next tile
- Shift + Tab - Navigate to previous tile
- Arrow Keys - Navigate to closest tile in direction
- Escape - Clear selection
- 1 - Select main light
- 2 - Select ambient light 1
- 3 - Select ambient light 2
- 4 - Select background
Edit Operations
- Ctrl + Z - Undo
- Ctrl + Shift + Z - Redo
- Ctrl + Y - Redo (alternative)
- Ctrl + A - Select all tiles and labels
- Ctrl + D - Duplicate selection
Scene & Lighting Controls
- < - Previous light scene
- > - Next light scene
- [ - Previous tone mapper
- ] - Next tone mapper
Lighting Adjustments
- E + +/- - Adjust exposure
- 1 + +/- - Adjust main light intensity
- 2 + +/- - Adjust ambient light 1 intensity
- 3 + +/- - Adjust ambient light 2 intensity
Clipboard Operations
- Ctrl + C - Copy selection (creates PNG for external apps + internal data)
- Ctrl + X - Cut selection
- Ctrl + V - Paste from clipboard (works with both PNG and internal data)
Tip: Copy works in two ways - creates PNG images you can paste into painting software, and preserves full tile data for pasting back into Colour Constructor.
Tile Operations
- Ctrl + Drag - Snap and auto-layout tiles
- Alt + Drag - Duplicate while dragging
- Shift + Click - Toggle selection
- Shift + Drag - Box select (add to selection)
- Delete - Delete selected tiles
Mouse Controls
- Wheel - Zoom in/out
- Shift + Wheel - Vertical pan
- Ctrl + Shift + Wheel - Horizontal pan
Interface Overview
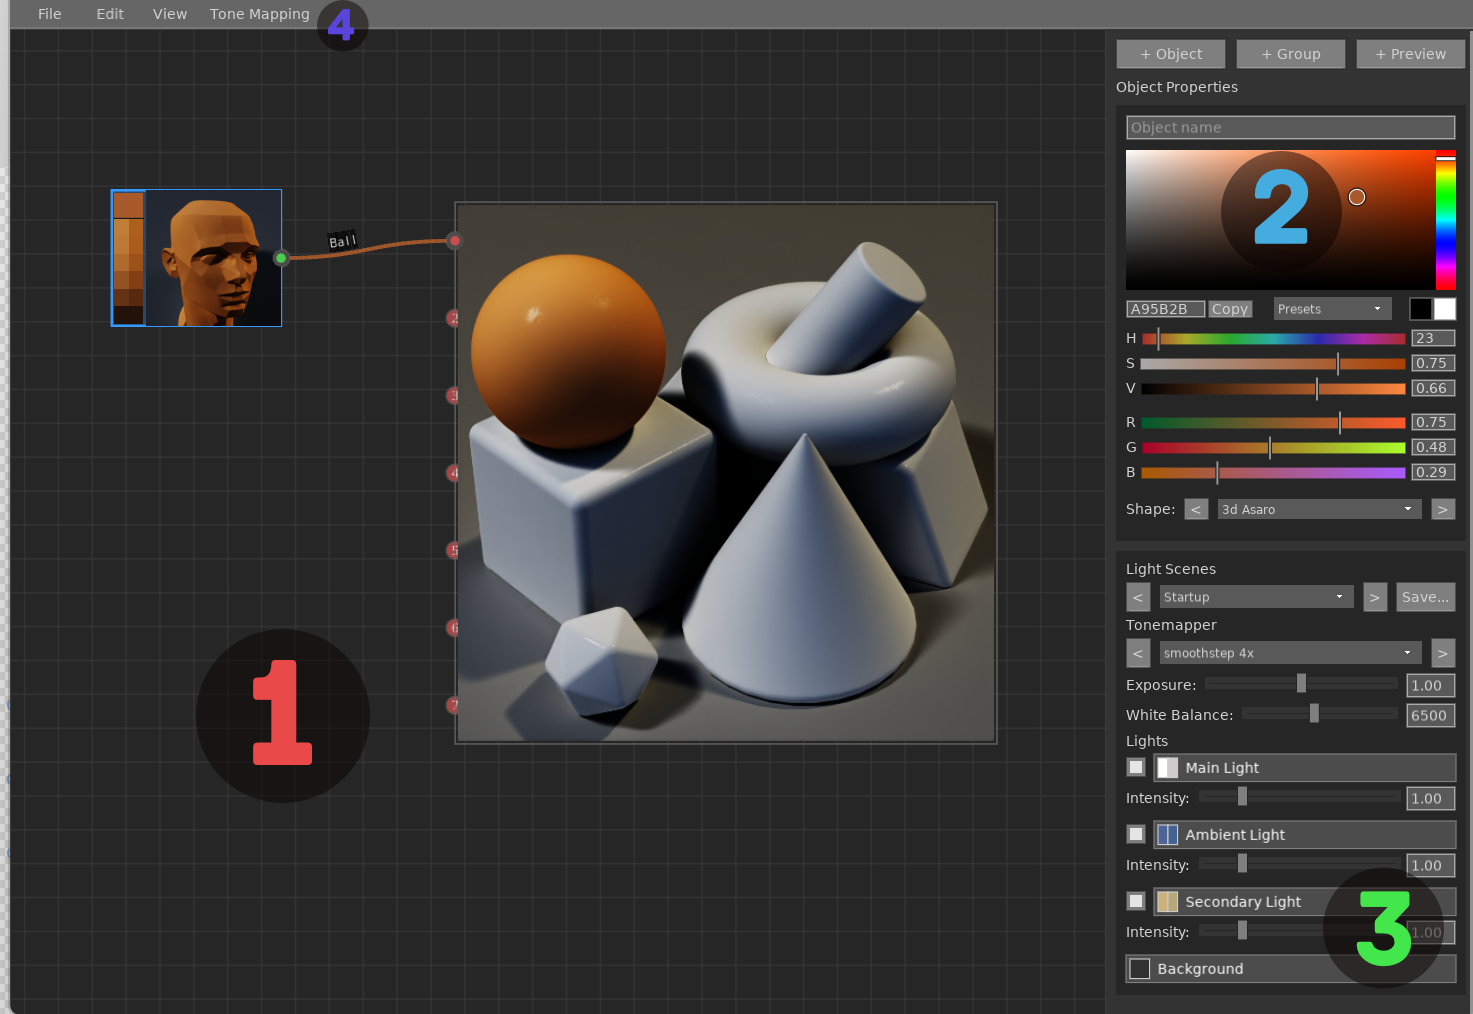
1. Tile Grid
- Zoomable Canvas - Create and arrange colour objects and preview objects
- Object Placement - Drag and position tiles in your workspace
- Node Connections - Connect objects to preview panels
2. Properties Editor
- Object Types - Change and configure different object types
- Context Editor - Edit colors, group modifications, and color harmonies
- Color Controls - HSV and RGB sliders for precise color selection
3. Light Section
- Light Objects - Selectable light sources with individual controls
- Scene Settings - Exposure, light scenes, tone mapping
- Environment - White balance and background color
4. Menu Bar
- File - New scene, save, save as, export swatches, export PNG, copy tiles to clipboard
- Edit - Undo, redo, copy, paste, preferences
- View - Zoom and UI scale controls
- Tonemapping - Global tonemapper settings
Color Picking
Colour Constructor provides three specialized color picker modes to suit different workflows and creative needs. When editing objects, you're setting the albedo (surface color) that defines how materials reflect and interact with light in the 3D preview.
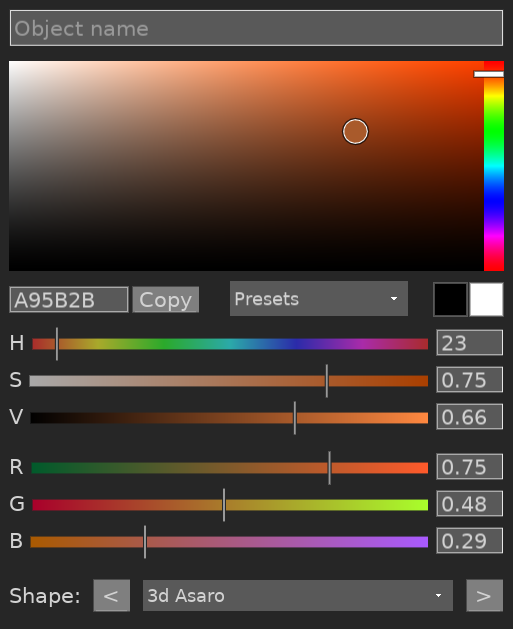
Standard Picker
When it appears: Selecting single tiles or light objects
Object editing: Sets the albedo (surface color) that determines how the material reflects light
Light editing: Sets the light color, which is then multiplied by the light's intensity value
Scope: Changes only affect the selected single tile
Controls Available
- HSV Sliders - Hue, Saturation, Value
- RGB Sliders - Red, Green, Blue precision
- Number Input - Type exact values
- Color Wheel - Visual hue selection
- Color Presets - Quick access to skin types, autumn leaves, and other collections
- Object Name - Label your color tiles (appears in swatch exports and top right of tiles)
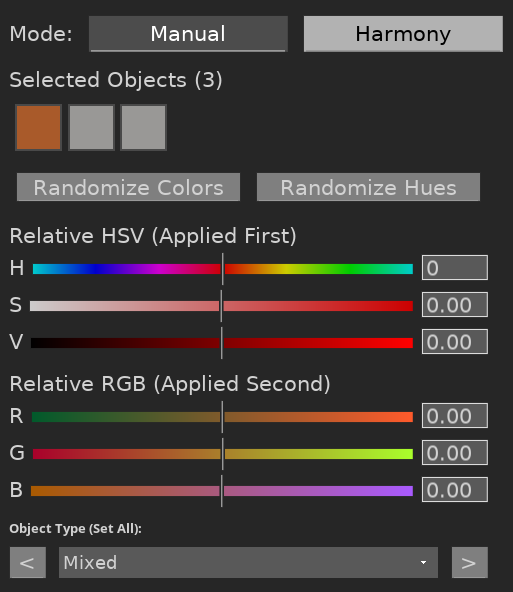
Group Picker - Manual Mode
When it appears: Multiple tiles selected + Manual toggle active
Purpose: Large-scale or subtle modifications to a range of tiles in one go
Best for: Adjusting brightness, saturation, or hue across multiple colors while maintaining their relationships
Toggle: Switch between Manual and Harmony modes at the top
How It Works
- Controls reset when you make a new selection
- HSV changes apply first, then RGB
- Using both HSV and RGB together may give unexpected results
Features
- Batch Editing - Modify all colors at once
- Object Type Controls - Dropdown and arrows to set all tile types simultaneously
- Randomization - Two different randomize buttons
- Relative Adjustments - Maintain color relationships
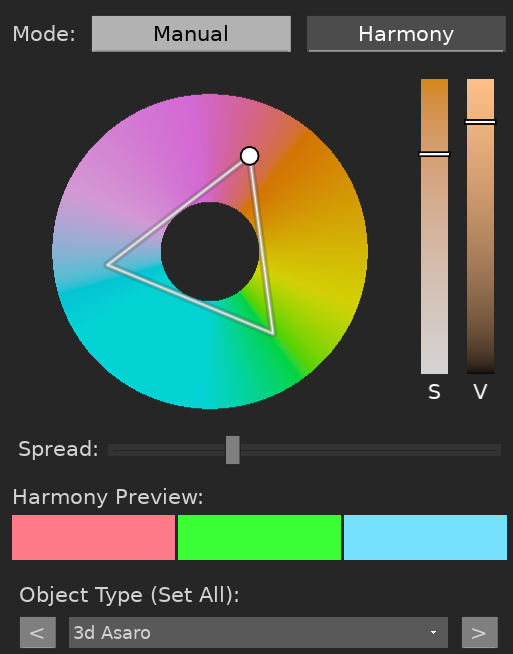
Group Picker - Harmony Mode
When it appears: Multiple tiles selected + Harmony toggle active
Purpose: Generating color scheme ideas and exploring harmonious color relationships
Best for: Creating complementary, triadic, and extended color harmonies for palettes and artistic compositions
Algorithm: Uses OKHSV for perceptually uniform color harmony generation
Toggle: Switch between Manual and Harmony modes at the top
Wheel Controls
- Click the wheel - Rotate base hue
- Spread slider - Control how far colors spread around the circle
- Hue/Saturation sliders - Adjust wheel brightness and saturation
Additional Features
- Object Type Controls - Dropdown and arrows to set all tile types simultaneously
- Different numbers of selected tiles = different harmony results
- Harmony generation starts automatically when you modify properties
- Spread bias affects the harmony distribution pattern
Object Types
Different object types show how colors appear on various surface materials. Each has unique lighting characteristics to help you understand how your colors will behave in different artistic contexts.
Available Types (Numbered as shown)
- 1. 2D Ball Classic - The traditional look from older versions. Simple and clean for basic color evaluation.
- 2. 2D Ball Handpainted - Stylized, impressionistic appearance. Good for seeing how colors feel rather than how they technically render.
- 3. 3D Ball Simple - Clean 3D ball with soft, even lighting. Great for beginners or when you need predictable results.
- 4. 3D Ball - Standard ball with dual surfaces: matte (top right) and glossy (bottom left). Shows how the same color behaves on different material types.
- 5. 3D Ball Isosphere - Faceted geometric surface makes it easier to pick out distinct color areas and relationships.
- 6. 3D Skin Ball - Ball with skin texture, specifically designed for portrait artists working with skin tones.
- 7. 3D Asaro - Classic art study head with geometric planes. Excellent for understanding how color changes across complex 3D forms.
Choosing the Right Type
- For stylized art - 2D Ball Classic or Handpainted work well for illustration and cartoon styles
- For realistic work - 3D Ball Simple or standard 3D Ball provide more accurate lighting information
- For portrait work - 3D Skin Ball shows how colors interact with skin-like surfaces
- For color study - Isosphere's facets make it easy to see distinct color relationships
- For form study - 3D Asaro head teaches how colors change across complex geometric planes
Tip: You can experiment with different object types to see how the same palette behaves across different surface characteristics. This helps build intuition about material properties and lighting.
Custom Objects
Want to create your own object types? You can render custom image masks for specialized surfaces or materials. Learn how to create custom objects using Blender.
Available Object Types

Lighting Preview
Colour Constructor creates realistic lighting effects using image masks and compositing techniques. This allows you to see how your colors appear under different lighting conditions - essential for creating cohesive palettes.
How It Works
- Uses image masks to simulate surface materials
- Compositing creates realistic lighting effects
- Real-time preview as you adjust colors and lighting
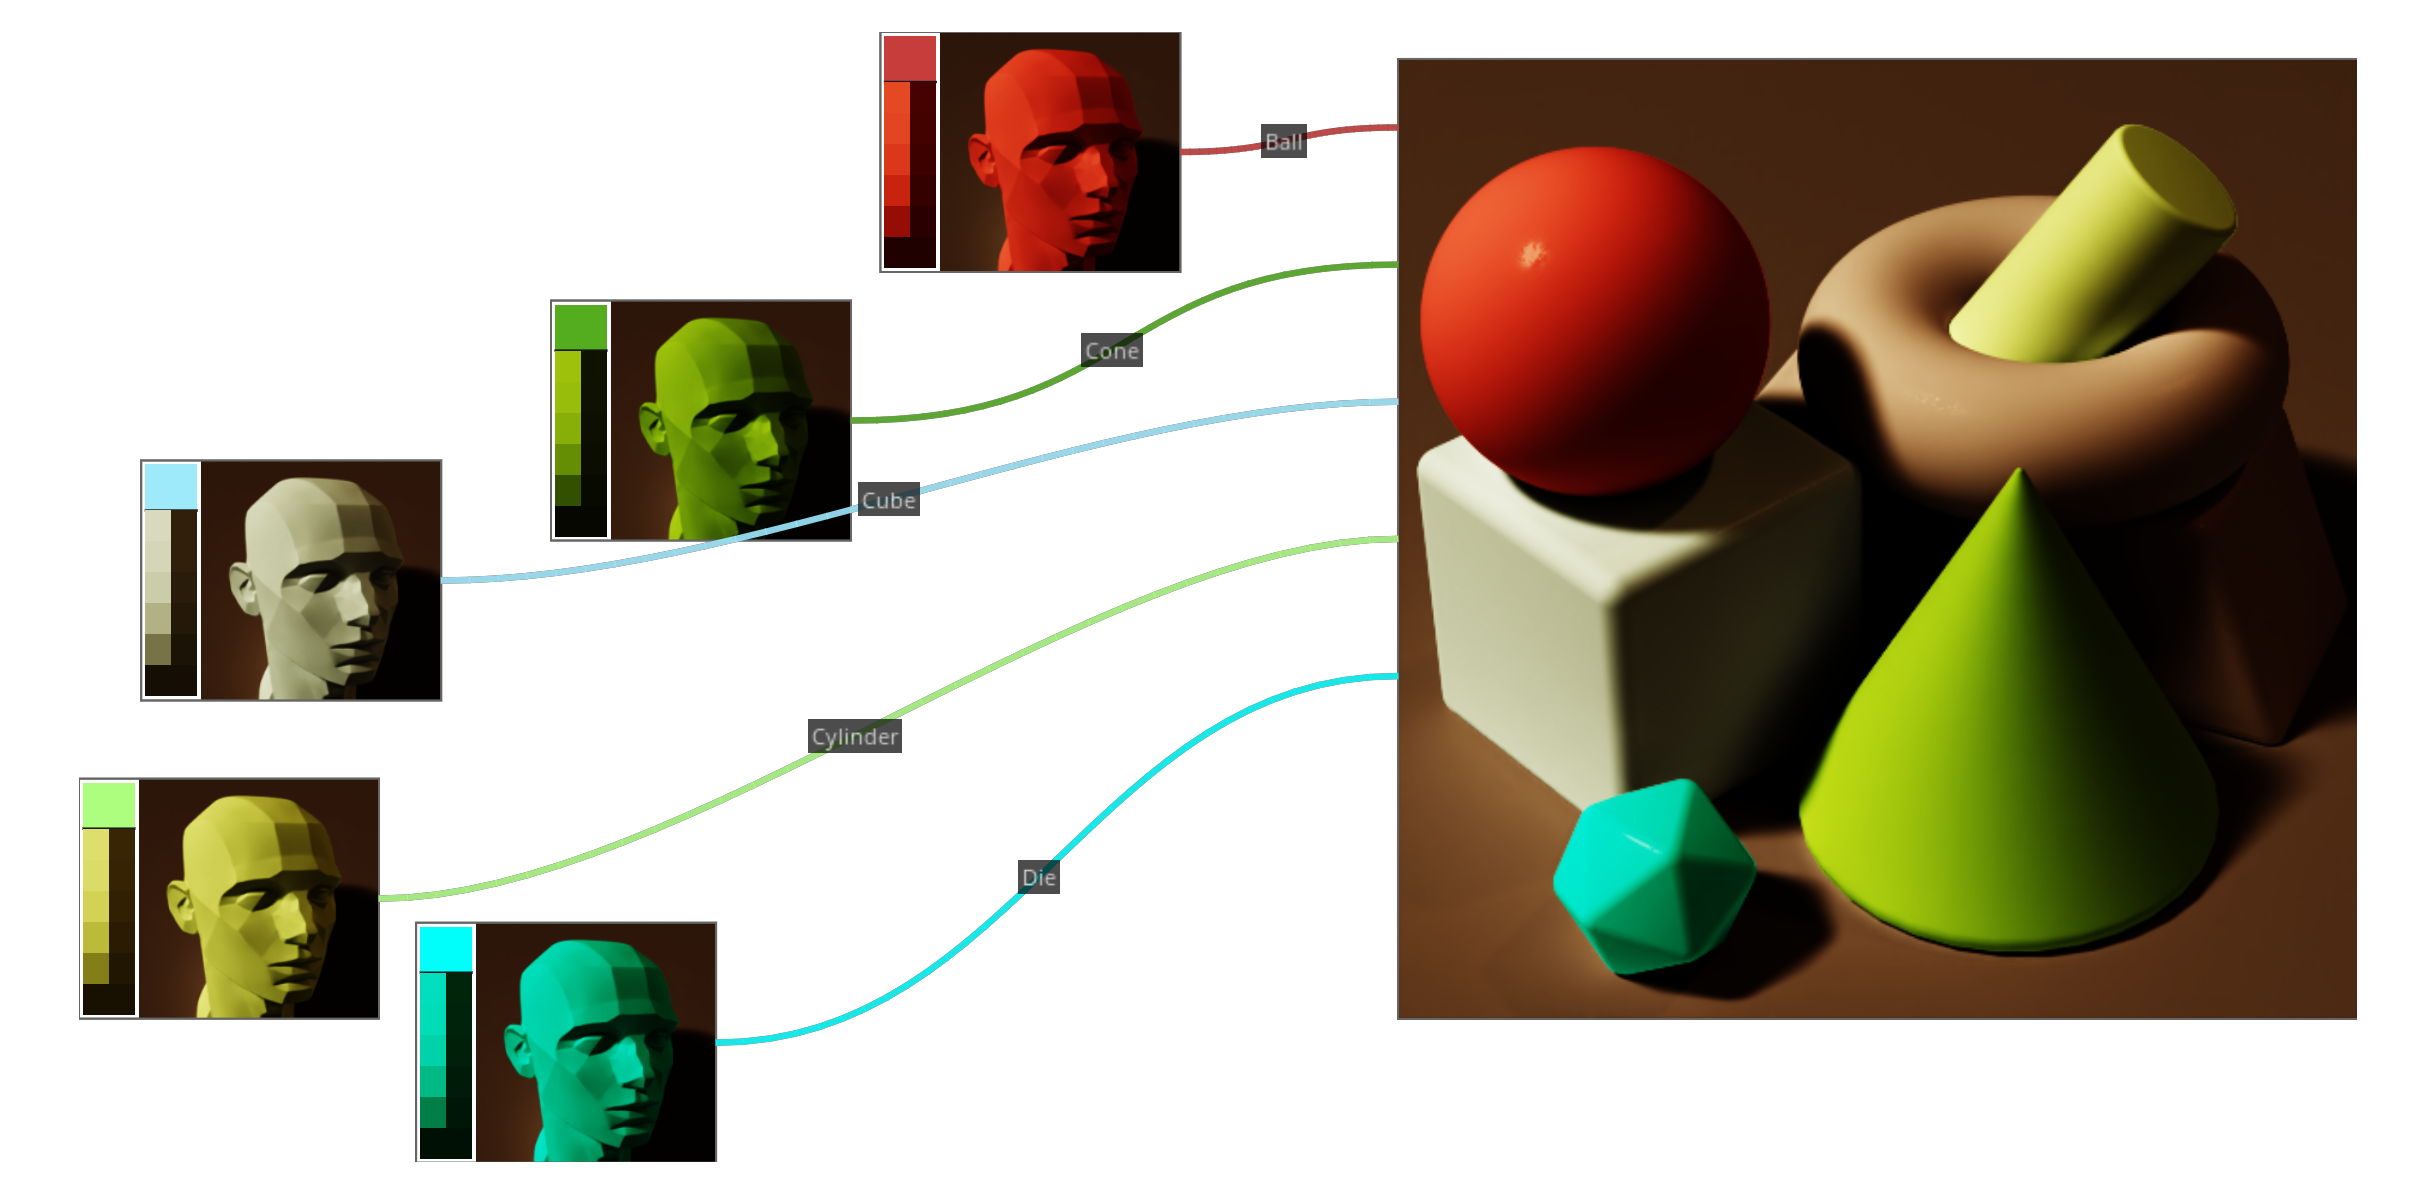
Node Connections
Node connections link your color tiles to preview panels, allowing you to see how specific colors look under lighting. Each connection is shown as a curved line (bezier curve) from the tile to the preview panel.
- Manual Connection - Drag from a color tile's connection point to a preview panel
- Auto Connection - Hold Ctrl while dragging with multiple tiles selected
- Smart Ordering - Auto connection uses vertical position to determine logical order
- Multiple Connections - One tile can connect to multiple preview panels
- Visual Feedback - Connection lines show when both tile and preview are selected
- Disconnect - Drag the connection off the node to remove it
White Balance
White balance adjusts the color temperature of your lighting, simulating different light sources.
- Kelvin Scale - Lower values (3000K) = warm/orange, higher values (6500K+) = cool/blue
- Daylight - 6500K is neutral daylight white balance
- Candlelight - 2000-3000K creates warm, cozy lighting
- Overcast Sky - 7000K+ creates cool, blue-tinted lighting
- Real-time Preview - See how white balance affects your entire palette instantly
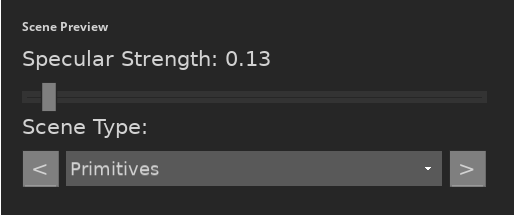
Scene Controls
- Single Selection Required - Select a single scene preview tile to access these controls
- Scene Type Dropdown - Change between different lighting environments
- Specular Strength - Control the intensity of specular highlights
- Stylized vs Realistic - Lower specular (0) creates stylized look, higher values for realism
Example Scene Preview
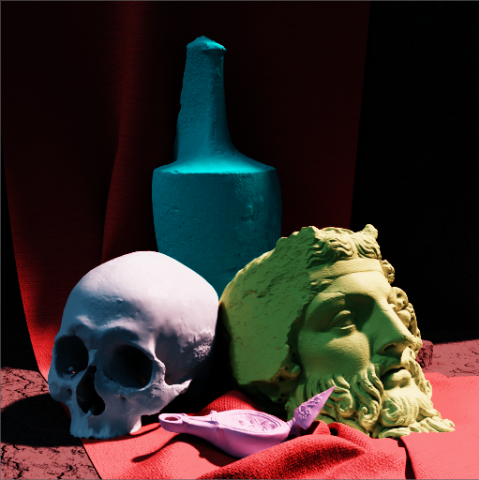
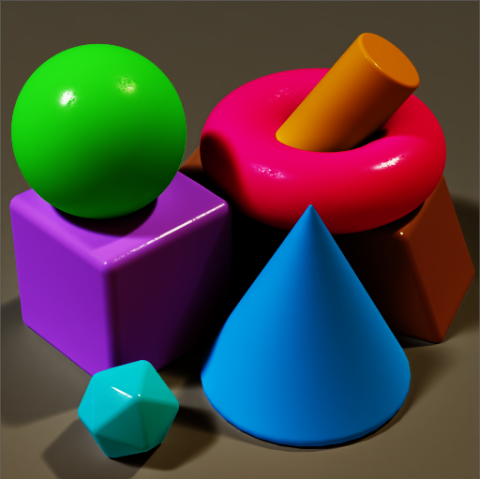
Still Life Scene
Connecting Nodes: Ctrl Drag Shortcut
Scene Controls
Light Scene Management
Quickly test your color palette under different lighting conditions. Scenes store lighting environments so you can see how your colors work under candlelight, harsh sunlight, moonlight, and other scenarios.
Example: Same Palette Under Different Lighting
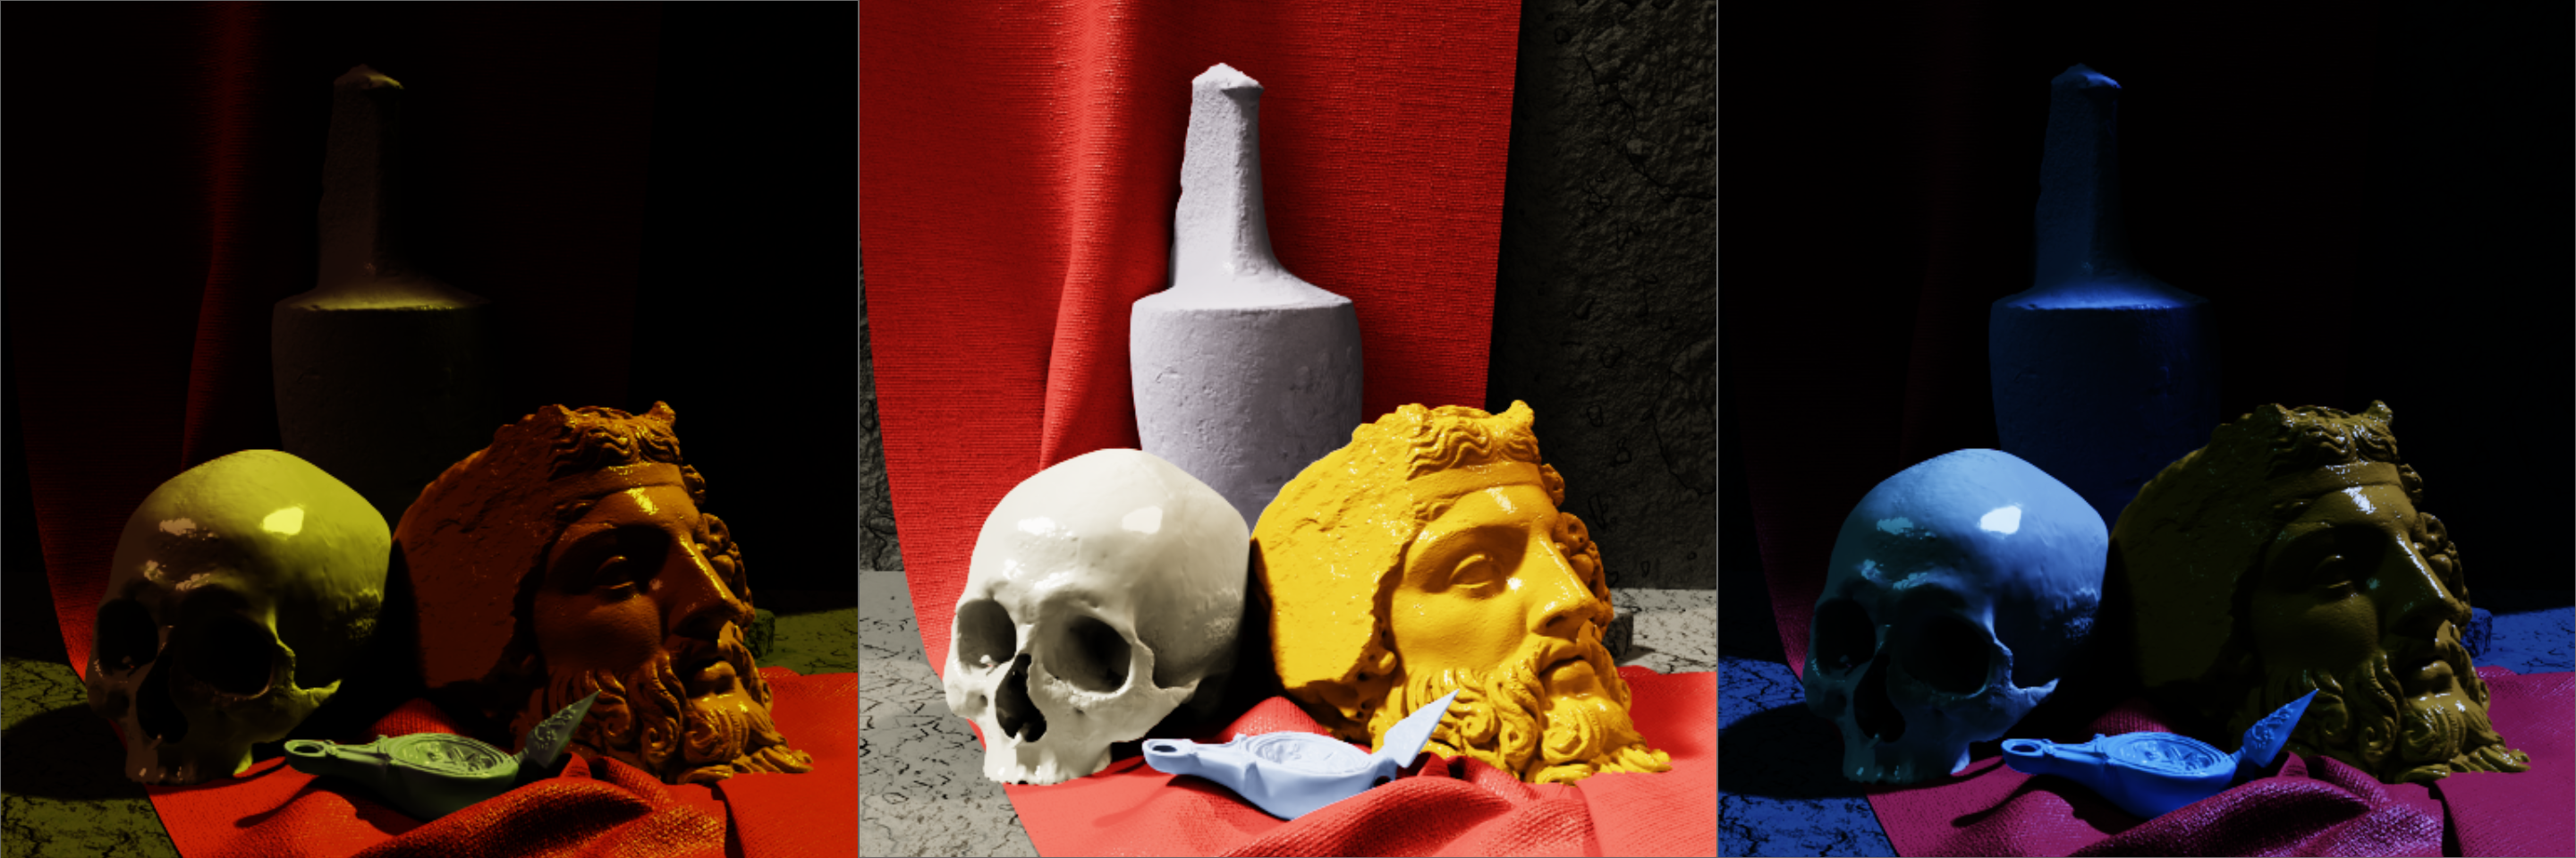
The same palette under Candlelight (warm), Desert Sun (harsh), and Moonlight (cool) lighting scenarios
Light Scenes vs Global Scenes
Light Scenes are for quickly testing different lighting on your current palette. Global Scenes save your complete workspace (colors, positions, lighting) anywhere on your PC.
How They Work Together
Light scenes are temporary - use < and > to quickly test different lighting. When you save a global scene, it includes whatever light scene is currently active.
Built-in Light Scenes
- Golden Hour - Warm sunlight
- Candlelight - Warm interior
- Moonlight - Cool nighttime
- Desert Sun - Harsh daylight
- Forest Shade - Soft green lighting
- ...and more
Light Scenes (Quick Testing)
- Light Scene Dropdown - Select from built-in options
- Keyboard: < and > to cycle through
Your object colors will stay unchanged
Global Scenes (Save Projects)
- File → Save Scene - Save complete workspace anywhere
- File → Load Scene - Restore complete workspace
Includes whatever light scene is currently active
Exporting Your Palette
Copy and Paste Preview (Recommended)
Preferred Method
- Direct Copy/Paste - Select tiles and copy directly into painting apps
- Transparent PNG - Creates clean, transparent background
- Node Connections - Only visible when both root node and scene preview are selected
- Individual Tiles - Copy single tiles to keep them separate
Making selections of tiles and copying is the preferred method for getting previews into your painting applications. Colour Constructor supports additional export formats for different workflows:
PNG Swatch Export
- Modal Control - Set number of swatches per color
- 2 Swatches - Full lit + shadow color
- More Swatches - Divided by plane angle using Lambert lighting
- Compact Format - Very small, efficient PNG files
- Includes - Background colors and raw light colors
Adobe Swatch (.ase)
- Universal Format - Importable by most image editors
- Labels Important - Names and labels are preserved
- Complete Export - Includes background and light colors
- Professional - Standard industry format
Export Tips
- Names & Labels - Important for all export formats
- Background Colors - Exported with swatches
- Raw Light Colors - Available in swatches
- Choose Method - Copy/paste for speed, exports for archival
Export Example
Example PNG swatch export showing labeled color tiles with lighting variations
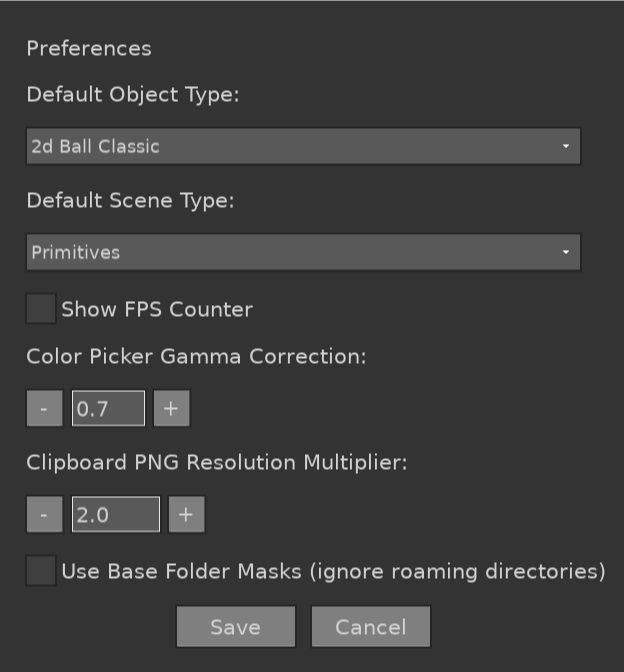
Preferences
Customize Colour Constructor's behavior through the preferences panel. Access via Edit → Preferences in the menu bar.
Default Settings
- Default Object Type - Sets the object type when creating new tiles
- Default Scene Type - Sets the scene preview type for new scene tiles
Display Options
- Show FPS Counter - Adds frame rate display to bottom of screen
- Color Picker Gamma Correction - Adjusts gamma curve for color picker (< 1.0 expands dark value area)
Performance
- Clipboard PNG Resolution Multiplier - Controls copy quality vs performance (lower if copying slows down)
- Use Base Folder Masks - Uses local folders instead of app data (advanced users only)
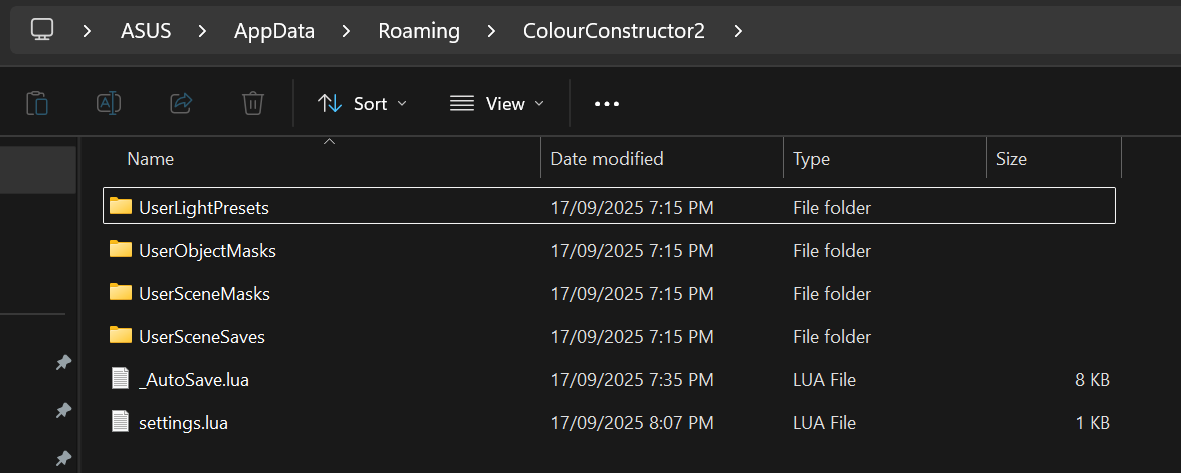
User Data & Custom Content
Colour Constructor stores user-specific content and settings in your system's application data folder. You can customize or remove content you don't want to see in the application.
Data Location
Windows:
C:\Users\USER\AppData\Roaming\ColourConstructor2
macOS:
~/Library/Application Support/ColourConstructor2
Replace "USER" with your username on Windows. On macOS, ~ is your home folder.
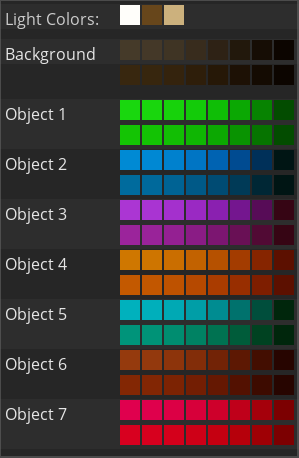
Folder Contents
- UserLightPresets - Custom lighting scene configurations
- UserObjectMasks - 3D object texture masks for lighting simulation
- UserSceneMasks - Scene preview background masks
- UserSceneSaves - Saved color palette projects
Folder Structure
Removing Unwanted Content
Delete files from any folder to remove them from the application:
- Light Presets - Remove lighting scenes you don't use
- Object/Scene Masks - Hide unwanted preview options
- Scene Saves - Clean up old projects
Note: Changes take effect after restarting the application
Restoring Defaults
If you need to restore the original presets and masks:
- Close Colour Constructor completely
- Delete the entire ColourConstructor2 folder from your roaming directory
- Restart the application
This will restore all default content but remove any custom saves
Custom Objects
Prerequisites: Basic Blender understanding is required to create custom object masks.
Blender Version: Plugin is made and tested in Blender 4.5+
📖 Need help? See the Blender documentation for detailed setup instructions.
Activate Plugin
Hit the play button in Blender's text editor to enable the plugin for this session

Template Structure
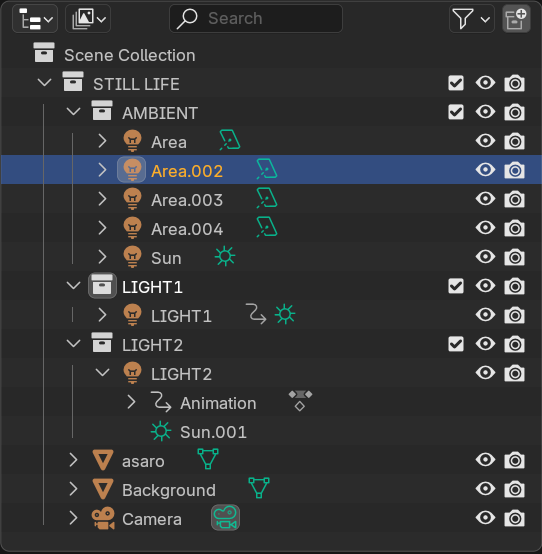
The Blender template contains a single .blend file with three collections that the plugin uses to generate lighting masks automatically:
- Light1 - Primary light source collection
- Light2 - Secondary light source collection
- Ambient - Ambient lighting collection
Collection Structure
Material Setup
- Unique Materials - Each object needs a different material
- Roughness & Textures - Connect these to material inputs - they translate to final alpha masks
- Middle Grey Base - Use middle grey as base color for optimal lighting setup
Workflow Steps
- Set Output Folder - Configure plugin to export to your user data folder
- Create Scene - Add your objects to the collections
- Setup Materials - Assign unique materials with roughness/textures
- Adjust Lighting - Use plugin controls to set brightness and specular
- Render Initial - Generate first version and test in Colour Constructor
- Calibrate Brightness - Set color to white, brightness to 1.0, exposure to 1.0
- Match Brightness - Adjust so brightest part matches existing swatches
Output Folder Path
Windows:
C:\Users\USER\AppData\Roaming\ColourConstructor2\
macOS:
~/Library/Application Support/ColourConstructor2/
Plugin will create UserObjectMasks subfolder automatically
Plugin Controls
- Light Brightness - Individual brightness controls for each light
- Specular Controls - Independent specular adjustment per light
- Auto Export - Plugin generates all required mask types
- Metadata Generation - Creates brightness normalization data
Settings are saved to a text file that Colour Constructor uses for brightness normalization
Generated Files
The plugin creates these files for Colour Constructor:
- 3 Image Types - Different lighting mask layers
- Metadata File - Brightness offsets and object mappings
Example Metadata (socket_names.lua)
local socketNames = {
    [0] = "Icosphere", -- MASK1.R
    [1] = "Plane",     -- MASK1.G
}

local exposureOffsets = {
    ambient = 1.5,  -- Ambient exposure
    light1 = 3.5,   -- Light 1 exposure
    light2 = 3.5,   -- Light 2 exposure
}

local specularityOffsets = {
    ambient = 0.5,  -- Ambient specularity
    light1 = 1.0,   -- Light 1 specularity
    light2 = -0.5,  -- Light 2 specularity
}